3D printing has evolved far beyond basic prototyping, and today makers aim for smooth, professional-looking surfaces straight off the printer. One of the most effective but often underused features in slicer software is ironing settings 3d print, which can dramatically improve the top layer finish of your models. When configured correctly, ironing helps eliminate visible layer lines and creates a polished, near-injection-molded appearance on flat surfaces.
However, many users either ignore this feature or struggle to tune it properly, resulting in wasted time or poor surface quality. Understanding how ironing works and how to apply it correctly can make a significant difference in your print results. In this guide, we will explore practical tips and techniques to help you improve print quality using ironing settings for better, more professional 3D prints.
Understanding Ironing Settings in 3D Printing
Ironing is a slicer feature that re-traces the top surface of a print with a slow-moving, lightly extruding nozzle. Instead of laying down new material, it smooths out the existing top layer by gently melting and flattening it. This is why ironing settings 3d print is especially useful for cosmetic surfaces like lids, covers, and decorative parts.
Most slicers, including Cura, PrusaSlicer, and Creality Print, offer ironing options that allow you to control flow rate, speed, and pattern. These parameters determine how aggressively the nozzle irons the surface. When properly set, ironing can reduce gaps, improve shine, and create a consistent top layer finish without requiring post-processing like sanding.
The key is understanding that ironing is not a universal solution. It works best on flat horizontal surfaces and is less effective on curved or complex geometries. Knowing when to enable or disable it is the first step toward improving overall print quality.
Choosing the Right Ironing Flow and Speed
One of the most important factors in ironing settings 3d print is the flow rate. This controls how much filament is extruded during the ironing pass. If the flow is too high, you may see blobs or uneven surfaces. If it is too low, the ironing effect becomes weak and ineffective.
A good starting point for most PLA prints is between 10% to 15% flow rate. From there, you can fine-tune based on the material and surface results. PETG and ABS may require slightly different adjustments due to their thermal properties and cooling behavior.
Speed is equally important. Ironing too fast will not give the nozzle enough time to properly smooth the surface. Typically, a slower speed—around 10 to 20 mm/s—produces the best results. Slower speeds allow consistent heat distribution, which improves the final finish and reduces visible inconsistencies.
Balancing flow and speed ensures that the ironing process enhances the print rather than damaging it. Small test prints are highly recommended when dialing in these settings.
Optimizing Temperature and Material for Better Ironing Results
Material choice plays a major role in how effective ironing settings 3d print will be. PLA is generally the easiest filament for ironing because it melts evenly and responds well to heat smoothing. PETG can also be ironed successfully, but it requires more careful tuning due to its stickier nature.
Temperature adjustments can significantly improve results. Slightly increasing nozzle temperature—by 5°C to 10°C during ironing—can help the filament flow more smoothly across the surface. However, too much heat may cause over-melting or loss of detail.
Cooling settings should also be considered. Strong part cooling fans help PLA achieve a crisp finish after ironing, while PETG may require reduced cooling to avoid warping or surface roughness. Balancing these variables ensures that ironing enhances rather than distorts your final print surface.
Experimenting with material-specific profiles is one of the best ways to consistently achieve high-quality results. Over time, you can build presets that deliver reliable finishes across different projects.
Best Slicer Settings for Consistent Ironing Performance
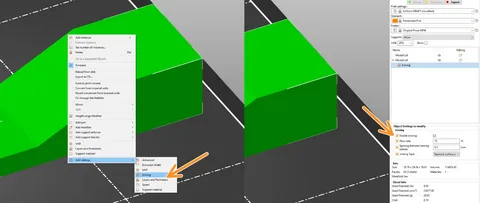
Different slicers provide different levels of control over ironing settings 3d print, but the core principles remain the same. In Cura, for example, you can enable ironing for top surfaces only or across all top layers, depending on your needs. PrusaSlicer offers more advanced pattern control, allowing linear or concentric ironing paths.
Layer height also affects ironing quality. Lower layer heights generally produce smoother surfaces before ironing even begins, which means the ironing process has less work to do. Combining a fine layer height with ironing often results in near-perfect top surfaces.
Another important setting is ironing pattern spacing. Tighter spacing leads to smoother finishes but increases print time. Wider spacing speeds up the process but may leave slight inconsistencies. Finding the right balance depends on whether you prioritize speed or surface quality.
Consistent results come from maintaining stable slicer profiles. Once you find a combination that works, save it as a preset for future use to avoid repeating the tuning process.
Common Mistakes and How to Avoid Them
One of the most common mistakes when using ironing settings 3d print is enabling it for every model without considering geometry. Ironing should only be used for flat top surfaces; using it on complex or curved areas often leads to poor results or wasted print time.
Another mistake is using excessive flow rates. Over-extrusion during ironing can create ridges instead of smoothing them. Always start low and gradually increase if needed. Similarly, running ironing at high speeds reduces its effectiveness and defeats its purpose.
Users also often forget to calibrate their printers before experimenting with ironing. Bed leveling, extrusion calibration, and temperature tuning all play a role in how well ironing performs. Skipping these basics can lead to inconsistent finishes regardless of slicer settings.
Avoiding these mistakes ensures that ironing becomes a powerful finishing tool rather than a frustrating feature that produces unpredictable results.
Advanced Tips for Professional-Grade Surface Finishing
For users looking to push ironing settings 3d print to a professional level, combining ironing with adaptive layer heights can produce exceptional results. Adaptive layers allow finer resolution only where needed, improving surface quality while keeping print times manageable.
Another advanced technique is using ironing only on the final top layer while increasing top solid layers. This provides a stronger base for ironing to work on, reducing the risk of gaps or uneven smoothing. It also improves structural integrity in functional prints.
Some advanced users also experiment with custom ironing patterns in slicers that support it. Concentric patterns can improve circular parts, while linear patterns work better for rectangular surfaces. Choosing the right pattern based on geometry can significantly enhance the final appearance.
When combined with proper calibration and material tuning, these advanced strategies can elevate your prints from good to truly professional-grade finishes.
Conclusion
Mastering ironing settings 3d print is one of the most effective ways to improve the visual quality of your 3D printed parts without additional post-processing. While it may seem like a small slicer feature, it has a major impact on surface smoothness and overall presentation when configured correctly.
By understanding how ironing works, adjusting flow and speed, optimizing material settings, and avoiding common mistakes, you can consistently achieve cleaner and more professional-looking prints. With practice and fine-tuning, ironing becomes a powerful tool in your 3D printing workflow that elevates your results to the next level.