How to Measure Bolt Size: A Complete Step-by-Step Guide – Choosing the correct bolt is essential for creating a secure, reliable, and long-lasting connection. However, finding the right replacement can be difficult when the original bolt is missing, damaged, or has an unclear specification. Understanding how to measure bolt size accurately allows you to identify the correct fastener without relying on guesswork.
Bolt measurement involves more than simply checking its overall length. Diameter, thread pitch, thread type, and bolt length all play important roles in determining whether a bolt will fit a specific application. This complete guide explains how to measure bolt size step by step. https://tokohasil.com
What You Need to Measure a Bolt
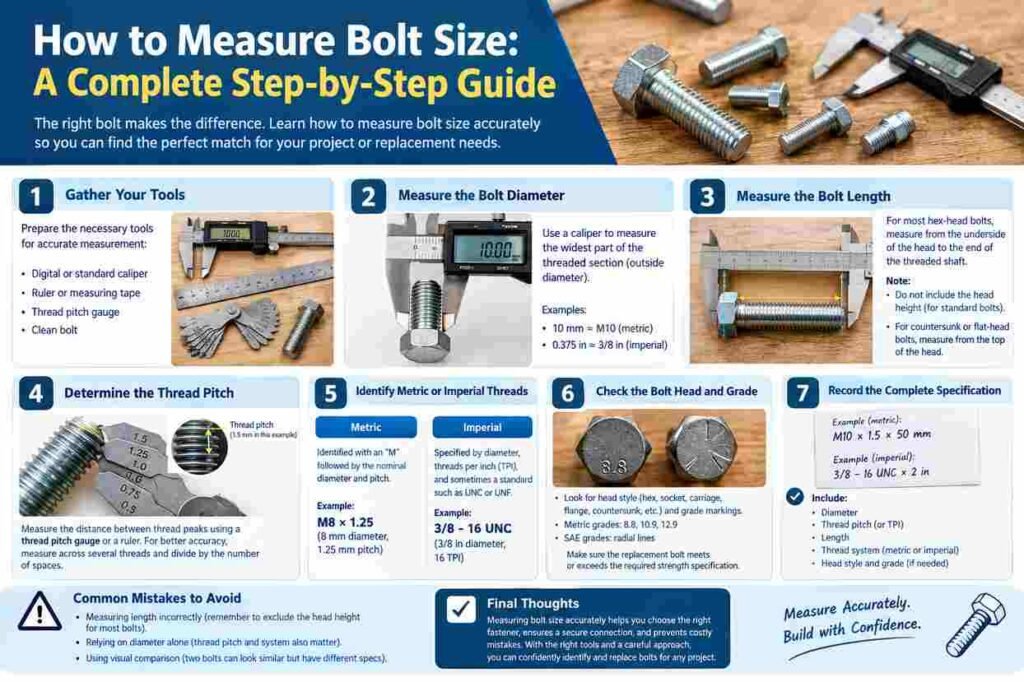
Before starting, prepare a few simple measuring tools. A digital or standard caliper is the most accurate option for measuring bolt diameter and length. A ruler or measuring tape can also work for basic measurements, although it may not provide the same precision.
A thread pitch gauge is useful when you need to determine the distance between threads. If you do not have one, you can estimate thread pitch by measuring several threads with a ruler, but this method is less accurate.
You should also have a clean bolt so that dirt, rust, or damaged threads do not interfere with your measurements.
Step 1: Measure the Bolt Diameter
The first measurement to determine is the bolt’s diameter. For a typical hex-head bolt, measure across the threaded section using a caliper.
Place the caliper jaws across the widest part of the threaded shaft, making sure you are measuring the outside diameter rather than the distance between two thread valleys.
For example, a measurement close to 10 mm generally indicates an M10 metric bolt. Similarly, a measurement close to 8 mm may indicate an M8 bolt.
For imperial bolts, diameter is normally expressed in inches or fractions of an inch. Common sizes include 1/4 inch, 5/16 inch, 3/8 inch, and 1/2 inch.
Keep in mind that the measured diameter may be slightly different from the nominal bolt size because of manufacturing tolerances.
Step 2: Measure the Bolt Length
Bolt length is another critical specification. For most standard bolts, measure from the underside of the bolt head to the end of the threaded shaft.
Do not normally include the head height when measuring the length of a hex-head bolt.
For example, if the distance from the underside of the head to the tip is 50 mm, the bolt length is generally described as 50 mm.
However, countersunk or flat-head bolts are an important exception. Because these bolts are designed to sit flush with the material surface, their length is usually measured from the top of the head to the tip.
Always consider the bolt’s head style before taking the final length measurement.
Step 3: Determine the Thread Pitch
Thread pitch describes the distance between individual threads. It is one of the most important measurements because two bolts can have the same diameter but different thread pitches.
For metric bolts, pitch is measured in millimeters. An M10 bolt, for example, can have different thread pitches depending on the specification.
To measure pitch manually, measure the distance between one thread peak and the next. For better accuracy, measure the distance across several threads and divide the result by the number of spaces.
A thread pitch gauge makes this process considerably easier. Simply match the gauge leaves against the bolt threads until you find the one that fits correctly.
Step 4: Identify Metric or Imperial Threads
After measuring the diameter and thread pitch, determine whether the bolt uses a metric or imperial thread system.
Metric bolts are commonly identified with an “M” followed by the nominal diameter and pitch. For example, M8 × 1.25 indicates an 8 mm nominal diameter and a 1.25 mm thread pitch.
Imperial bolts are generally specified by diameter, threads per inch (TPI), and sometimes a thread standard such as UNC or UNF.
A bolt that appears similar in size may still be incompatible if it uses a different thread system. Never force a bolt into a threaded hole simply because it appears to fit.
Step 5: Check the Bolt Head and Grade
Measuring the shaft is not always enough. You should also inspect the bolt head for markings and identify its head style.
Hex bolts, socket-head cap screws, carriage bolts, flange bolts, and countersunk bolts are designed for different applications.
Many industrial bolts also have markings on their heads that indicate strength or grade. Metric fasteners may use property-class markings such as 8.8, 10.9, or 12.9, while common SAE fasteners may use radial lines to indicate grade.
These markings should not be ignored when replacing a structural or high-load fastener. A replacement bolt should meet or exceed the required strength specification.
Step 6: Record the Complete Bolt Specification
Once all measurements have been taken, write them down in a standardized format.
For example:
M10 × 1.5 × 50 mm
This specification generally indicates a metric bolt with a nominal diameter of 10 mm, a thread pitch of 1.5 mm, and a length of 50 mm.
For an imperial fastener, the description may include the diameter, TPI, length, and thread series.
Recording the complete specification makes it much easier to order replacement fasteners accurately.
Common Mistakes When Measuring Bolts
One of the most common mistakes is measuring bolt length incorrectly. Remember that most conventional bolts are measured from underneath the head rather than from the top.
Another mistake is assuming that diameter alone identifies a bolt. Thread pitch and thread system are equally important. Using the wrong pitch can damage threads or create an unsafe connection.
It is also important not to rely solely on visual comparison. Two bolts can look almost identical while having different dimensions, grades, or thread standards.
Final Thoughts
Learning how to measure bolt size is a practical skill for construction, manufacturing, automotive repair, maintenance, and DIY projects. By carefully measuring diameter, length, and thread pitch—and checking the thread system, head style, and grade—you can select a replacement bolt with much greater confidence.
When accuracy matters, use a caliper and thread pitch gauge rather than relying on a ruler or visual estimation. Taking a few extra minutes to verify every specification can prevent compatibility problems and help ensure that the finished connection is strong, secure, and dependable.